In this tutorial, I will take you to step by step through the creation of this modern villa (Sailors Bay Rd), located in Australia, featuring a beautiful swimming pool and a relaxing fountain. The water simulation for this fountain was an interesting challenge; here I utilized the Phoenix plugin, as I find this is the best way to build and simulate fluids. The material of the villa is white and dark-grey cement, and wood material has been chosen for the garage doors and parts of the entrance. The use of glass along with a few additional decorative plants in the facade of the building has given a beautiful aesthetic look to this villa. To speed up the rendering, I used the Forest Pack plugin and the proxy method for scattering, preventing slow render times due to the number of polygons. Let’s get started!
Published At:
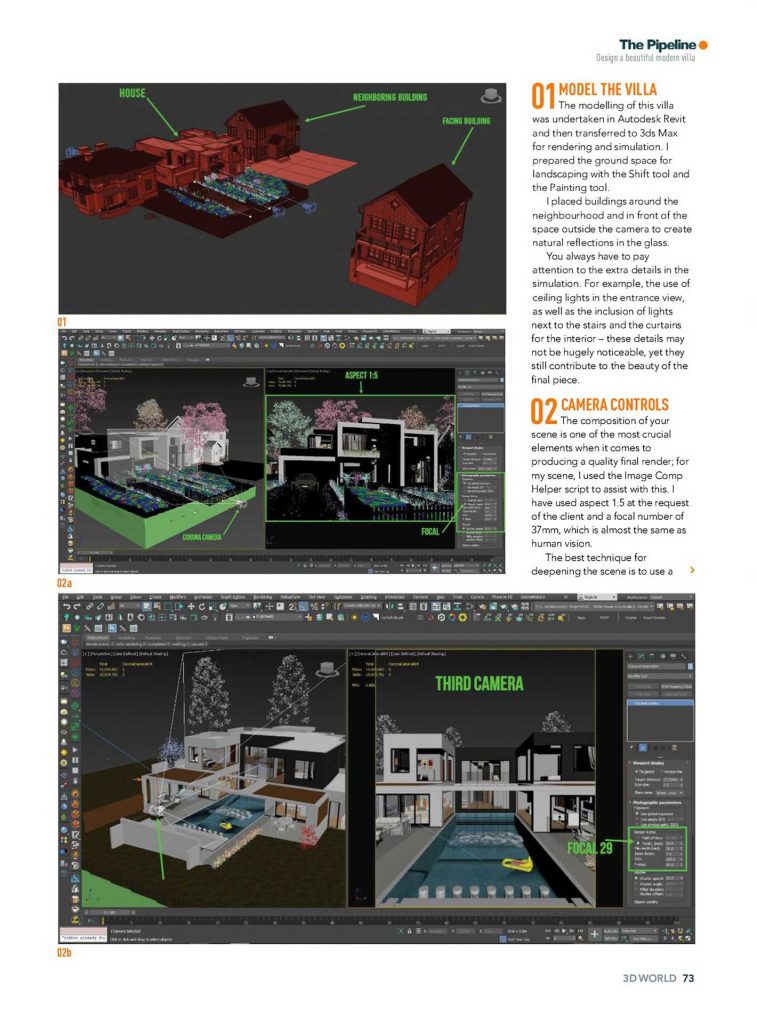
1 . MODEL THE VILLA
The modeling of this villa was undertaken in Autodesk Revit and then transferred to 3ds Max for rendering and simulation. I prepared the ground space for landscaping with the Shift tool and the Painting tool. I placed buildings around the neighborhood and in front of the space outside the camera to create natural reflections in the glass. You always have to pay attention to the extra details in the simulation. For example, the use of ceiling lights in the entrance view, as well as the inclusion of lights next to the stairs and the curtains for the interior – these details may not be hugely noticeable, yet they still contribute to the beauty of the final piece.
2 . CAMERA CONTROLS
The composition of your scene is one of the most crucial elements when it comes to producing a quality final render; for my scene, I used the Image Comp Helper script to assist with this. I have used aspect 1.5 at the request of the client and a focal number of 37mm, which is almost the same as human vision. The best technique for deepening the scene is to use a small focal length camera, and the recommended aspect for this type of image is vertical.
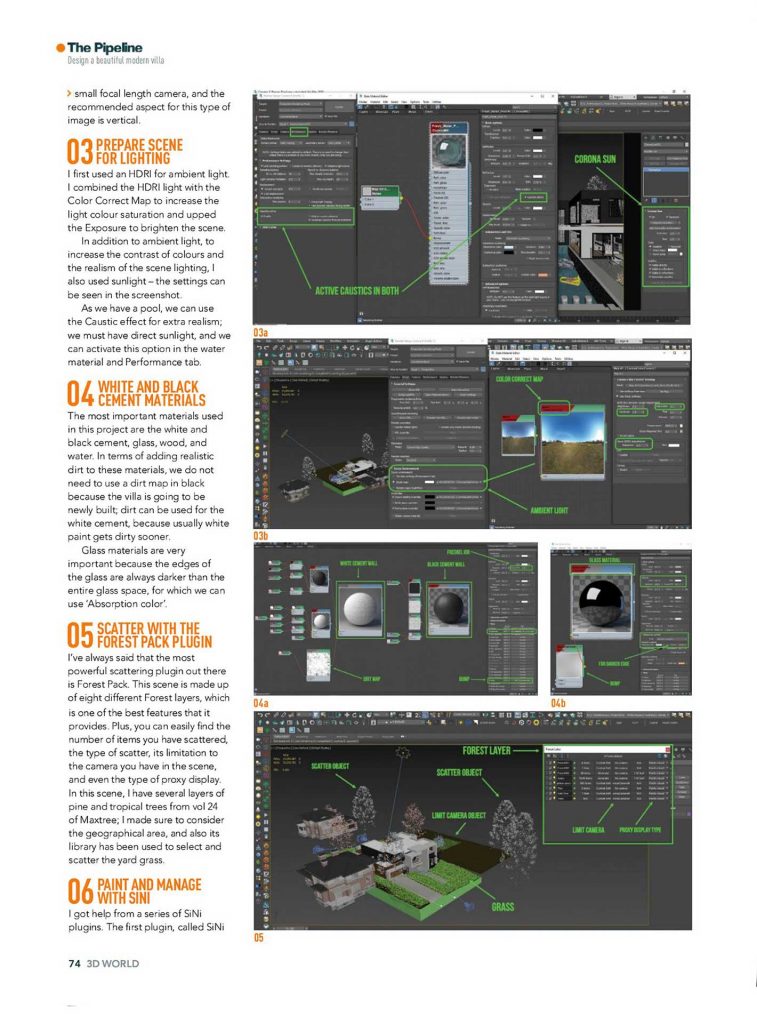
3 . PREPARE SCENE FOR LIGHTING
I first used an HDRI for ambient light. I combined the HDRI light with the Color Correct Map to increase the light color saturation and upped the Exposure to brighten the scene. In addition to ambient light, to increase the contrast of colors and the realism of the scene lighting, I also used sunlight – the settings can be seen in the screenshot. As we have a pool, we can use the Caustic effect for extra realism; we must have died sunlight, and we can activate this option in the water material and Performance tab.
4 . WHITE AND BLACK CEMENT MATERIALS
The most important materials used in this project are white and black cement, glass, wood, and water. In terms of adding realistic dirt to these materials, we do not need to use a dirt map in black because the villa is going to be newly built dirt can be used for the white cement, because usually, white paint gets dirty sooner. Glass materials are very important because the edges of the glass are always darker than the entire glass space, for which we can use ‘Absorption color’.
5 . SCATTER WITH THE FOREST PACK PIDGIN
I’ve always said that the most powerful scattering plugin out there is Forest Pack. This scene is made up of eight different Forest layers, which is one of the best features that it provides. Plus, you can easily find the number of items you have scattered, the type of scattering, its limitation to the camera you have in the scene, and even the type of proxy display. In this scene, I have several layers of pine and tropical trees from vol 24 of Maxtree; I made sure to consider the geographical area, and also its library has been used to select and scatter the yard grass.
6 . PAINT AND MANAGE U WITH SINI
I got help from a series of SiNi plugins. The first plugin called Sini Disperse was used for painting the leaves in the parking lot on the ground with a brush. For greater believability, we must paint more on the sides of the entrance and less on the part that is on the tire path.
I also use the SiNi Forensic plugin to manage the scene before rendering. This plugin helps to clean the scene, removing all the extra, unwanted items. It can also clear all viruses in the scene to start the rendering flawlessly.
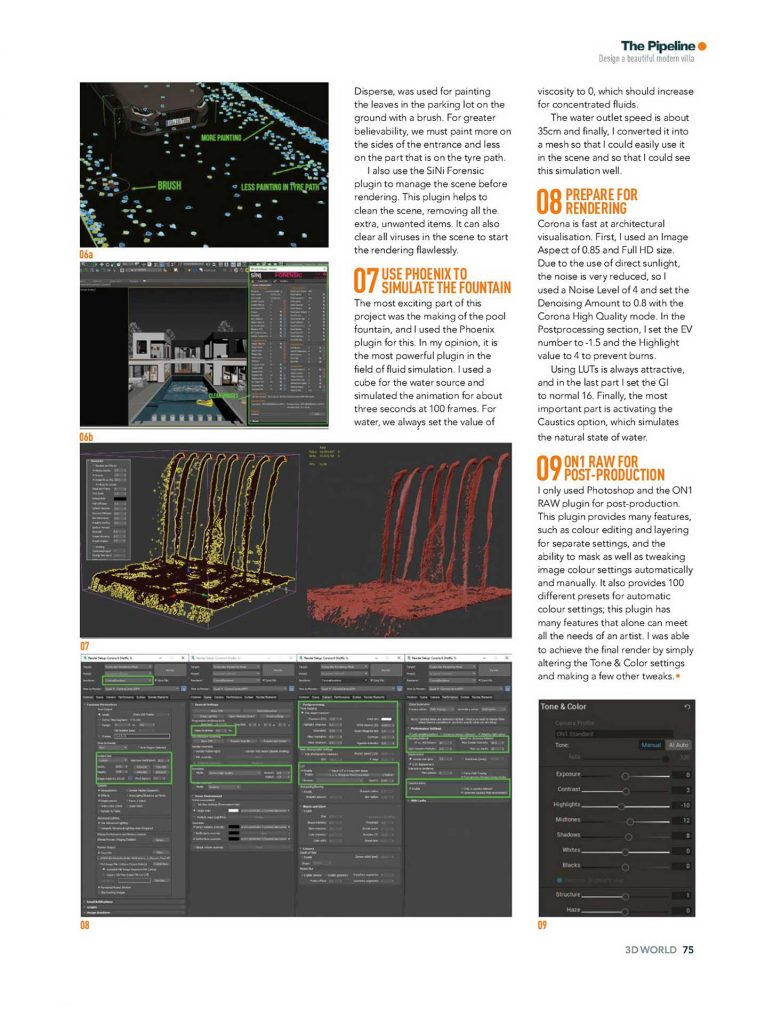
7 . USE PHOENIX TO SIMULATE THE FOUNTAIN
The most exciting part of this project was the making of the pool fountain, and I used the Phoenix plugin for this. In my opinion, it is the most powerful plugin in the field of fluid simulation. I used a cube for the water source and simulated the animation for about three seconds at 100 frames. For water, we always set the value of viscosity to 0, which should increase for concentrated fluids.
The water outlet speed is about 35cm and finally, I converted it into a mesh so that I could easily use it in the scene and so that I could see this simulation well.
Note: All the materials I have created so far are 70% of the work, the rest will be final when placed in a suitable environment and real light to make final edits on them.
8 . PREPARE E FOR RENDERING
“Corona is fast at architectural visualization. First, I used an image Aspect of 0.85 and Full HD size. Due to the use of direct sunlight, the noise is very reduced, so I used the Noise Level of 4 and set the Denoising Amount to 0 8 with the Corona High-Quality mode. In the Postprocessing section, I set the EV number to-1.5 and the Highlight value to 4 to prevent burns.
Using LUTs is always attractive, and in the last part, I set the GI to normal 16. Finally, the most important part is activating the Caustics option, which simulates the natural state of water.
9 . ON1RAW FOR POST-PRODUCTION
“I only used Photoshop and the ON1 RAW plugin for post-production This plugin provides many features, such as color editing and layering for separate settings, and the ability to mask as well as tweaking image’ color settings automatically and manually It also provides 100 different presets for automatic color settings, this plugin has many features that alone can meet all the needs of an artist. I was able
to achieve the final render by simply altering the Tone & Color settings and making a few other tweaks.
The article has been published in the “3D World Magazine” issue 275, and due to copyright rights, I have placed only screenshots of the magazine at the bottom of this page.